donderdag 31 juli 2014

Stashbusting n°01 [24 Out / 5 In]

At the beginning of the year I pledged to participate in the 3 Out, 1 In stashbusting challenge. For months almost nothing happened, I didn't touch my sewing machine and all the fabrics lay dormant on their shelves. Then they school year was finally over and in a moment of enlightenment I decided to sell/give away 22 pieces of fabric. All of which I'm quite certain I won't be using in the near future.

Aan het begin van het jaar besloot ik mee te doen aan the 3 Out, 1 In stashbusting challenge. De afgelopen maanden deed ik daar belachelijk weinig mee. Ik raakte mijn naaimachine maanden niet aan en mijn stofjes lagen te verstoffen in hun rek. Na de laatste examenperiode zag ik plots het licht en besloot om mijn kast te verlossen van 22 stofjes die wellicht nooit onder mijn naaimachine zouden belanden.

I won't show every single piece of fabric here, because this post would become way to long, but you can find an oversight of all the fabrics I'm parting with here.

Ik ga hier geen volledig overzicht van ieder stofje op mijn 'uit' stapel geven, deze post zou veel te lang worden, maar voor de geïnteresseerden, jullie kunnen hier een overzicht van al die stofjes vinden.

Of course I also bought some new fabrics. One of the perks of being continuously broke is that there is little chance of spending any money on new fabrics. The only exception being IKEA fabrics because they're cheap and Mon Depot fabrics, because they're also fairly cheap. The blue canvas fabric is from IKEA and is the perfect fabric for someone who has a keen appreciation of illustrated fauna & flora. I'll probably use this for a laptopbag/camerabag which I hope to make in the near future. The other two fabrics are from MonDepot. The green one is some sort of silky cotton which I intend to make into a simple tunic dress. The black dotted fabric is a nice cotton for a fifties inspired dress.

Natuurlijk kocht ik ook een paar nieuwe stofjes. Een van de voordelen van een constant gebrek aan fondsen is natuurlijk dat er niet veel geld naar nieuwe stofjes kan gaan. De enige uitzonderingen daarop zijn: Ikea stofjes (want altijd goedkoop) en Mon Depot stofjes (want ook vrij goedkoop). Dat het blauwe Ikea stofje in mijn kast belandde, kan niet zo verbazingwekkend zijn. Een combinatie van stofjes en botanische prenten? Check! De twee andere stofjes komen van Mon Depot. Het groene stofje is een zijde-achtig katoentje waarmee ik een soort simpel tuniek-jurkje wil maken. Het zwarte polkadot stofje moet een zwierig fifties jurkje worden. Nu nog iemand vinden die de patroontjes wil uitknippen en de stofjes wil klaarmaken. #ikbeneenluienaaister

The Balance: 24 out / 5 in. At the moment I have 21 pieces of fabric to give away/sell, I sold 1 piece and I used 2 pieces of fabric. I also bought 5 pieces of fabric. I used one to make a felt tablet cover and another to make a similar laptop cover.

The Balance: 24 out / 5 in. Momenteel heb ik 21 stofjes die ik wil weggeven (of verkopen zodat ik in nieuwe stofjes kan investeren!), 1 stofjes dat ik verkocht heb en 2 stofjes die ik gebruikt heb. Ik heb ook 5 stofjes gekocht, waarvan ik eentje gebruikte om een vilten tablet cover. Het tweede werd verwerkt tot een gelijkaardige cover voor mijn laptop.

Are you participating in some kind of stashbusting project?

Doen jullie mee in een stashbusting project?

woensdag 30 juli 2014

Workspace Wednesday

Currently I'm working on my school assignment for my Graphic Design resit. It has something to do with a Graphic Design Celebrity and we have to make the logo, brochure, poster,... for an art show about the Graphic Designer. Currently I'm a bit stuck, I don't now how to start so I keep repeating the first part of our assignment and I keep making these studies and sketches of (different parts of) heads.

Momenteel werk ik aan mijn nieuwe schoolopdracht voor mijn herexamen Grafisch Design. We moeten het een en ander doen rond een Grafische Beroemdheid en de hypothetische tentoonstelling over deze beroemdheid. Zo moeten we onder andere een logo ontwerpen, een brochure uitwerken en een poster maken. 'k Heb alleen een klein beetje last van beslissingsdeficiëntie. Ik blijf dus maar prutsen aan het eerste deel van de opdracht waarvoor we verschillende studies van hoofden en onderdelen van het hoofd moeten maken.

donderdag 24 juli 2014

Staircase Make-over // Den trap

The last big project I finished was redoing our staircase. It was a lot of work and I'm very happy with the result, so I would like to share the before and after and the process. My only concern that this will become a very dull post, so I'll try to keep my amount of talk about the process to a minimum and show some pictures. I will share some tips & experiences at the bottom of the post though, for whoever is mad enough to redo her or his own staircase.

Het laatste grote project dat hier in huis afraakte was onze trap. We hebben er heel wat werk aan gehad en ik ben erg tevreden met het eindresultaat. Zo tevreden dat ik ook graag mijn proces wou delen. Ik heb gemerkt dat ik nogal snel extreem uitgeweid begin te schrijven over dit project, het was dan ook een werk van lange adem. Ik ga het proberen vooral bij foto's te houden, maar onderaan de post staan een paar tips (voor zij die gek genoeg zijn om zelf aan zo een trap te beginnen).

When we first moved into our house, there was this thick, grey carpet on the staircase and in the rooms on the second floor. It was ugly and stuffy and when we discovered what was underneath it, it was also really a shame!

Toen we net in ons huis trokken, was de trap nog bedekt onder een dikke laag tapijt. Geen mooi zicht! Stoffig & donker en toen we ontdekten wat onder het tapijt zat (dat boven ook op de gang en in de kamers doorliep): zonde!

In the rooms on the second floor there was actually a nice parquet floor underneath the carpet. Also the staircase was in good condition, but because of the colour difference between the first step and the rest of the staircase we couldn't leave it like it was. It was also rather dark.

Op de tweede verdieping bleek overal parket onder het tapijt te liggen en ook de trap was in goede conditie. We zouden het zo gelaten hebben, moest er geen groot kleurverschil op de eerste trede en de rest van de trap gezeten hebben. De trap was ook nogal donker, we zagen een lichtere kleur wel zitten.

After sanding for a little while we discoverd the staircase was probably oak beneath all those layers of varnish. So we decided the use some sort of whitewashed oil on the horizontal parts and paint everything else whitè.

Na een beetje schuren bleek dat er een eiken trap onder de lagen vernis school. We besloten om de horizontale vlakken volledig blank te zetten en met een wit getinte olie te behandelen. De rest van de trap was zoveel prutswerk om op te schuren dat we naar de witte lak grepen. Misschien als er ooit een budget is voor de trap te laten zandstralen dat we dat nog eens gaan overwegen, maar nu wouden we vooral een afgewerkte trap.

It took me two layers of primer and two layers of paint to get the staircase really white, but I think it was worth the effort.

Het kostte onze twee lagen primer en twee lagen witte lak vooral de trap echt wit was, maar ik denk wel dat het het waard was.

Some tips // Een paar tips:

  • When I first started out I used a paste made of St. Marc cleaning product, flower and water and a putty-knife to remove the layers of varnish, because I didn't liked the idea of using a chemical paint remover when we had our cats to consider. It took me hours to do a couple of steps and they always stayed a little bit stained. Whilst this would work for smaller project, I can't recommend it for bigger projects. // Oorspronkelijk wilde ik geen gebruik maken van een afbijtmiddel, omdat ik dit niet vertrouwde met onze katten. Ik maakte een papje van St. Marc, water en bloem, smeerde dit over de treden en krabde de laag na een tijdje intrekken toen weg met een plamuurmesje. Het koste uren om een paar treden te doen en ze bleven altijd een beetje donkerder geplekt dan de andere treden. Ik zou deze werkwijze niet aanraden voor grote projecten, maar voor een klein project is deze manier volgens mij wel bruikbaar.
  • We used a chemical paint remover after that first attempt. We put our cats outside and aired out really well afterwards. We still needed to do some sanding, so this is also no dust free solution. // We schakelden uiteindelijk toch over op een chemisch afbijtproduct. De katten werden buiten gestoken en nadien verluchtten we alles heel goed. Dit ging stukken vlotter, al moesten we natuurlijk nog steeds veel opschuren nadien
  • Make sure you put away everything in you hallway, close the doors and put wet towels in front of them. We didn't do this and we had to clean almost every room in our house afterwards because the dus got everywhere // Zorg dat er absoluut niets in uw gang blijft staan of liggen en leg natte doeken voor de deuren zodat het stof de kamers niet binnen kan. Wij hebben dit niet gedaan en mochten nadien iedere kamer in het huis schoonmaken.
  • Really put your time in taping everything off! I did this carefully and I had almost no leaking through and no cleaning up afterwards. I could just rip away the newspapers and tape and admire my hard work! //Neem je tijd om alles goed af te tapen. Ik had alles heel netjes afgetaped en nadien had ik bijna nergens verf die was doorgelopen en moest opgeruimd worden. Ik kon gewoon de kranten en de plakband verwijderen en bewonderend naar mijn hard werk kijken.

maandag 21 juli 2014

This & That [3]

On Mondays I like to share a little bit of this & that. Things that make me wonder, photos to marvel at and pictures to stare at and dream away. Always topped of with some words, be it of wisdom or some strange pun. Today is no different.

Illustration I discovered Steve Simpson's Facebook page by the magic of the "You might also be interested in these pages"-suggestions of Facebook. Steve makes pretty awesome illustrations that make me wish I could do nothing all day but draw and he shares pretty cool stuff (like sketchbook pages, which is an instant win for me!). Currently he is one of 7 illustrators who take part in #OnTheDraw, a project in which the illustrators draw their stay at Gran Canary. I love the drawings he has made this far on his journey.

Steve Simpsons drawings for #OnTheDraw Steve Simpsons drawings for #OnTheDraw Steve Simpsons drawings for #OnTheDraw Steve Simpsons drawings for #OnTheDraw Image Source: Steve Simpson Illustration

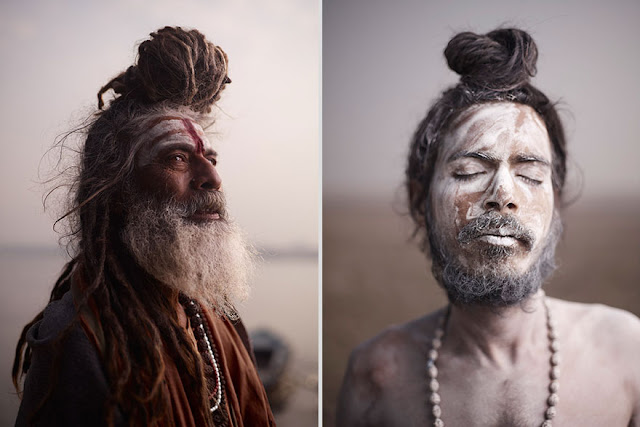
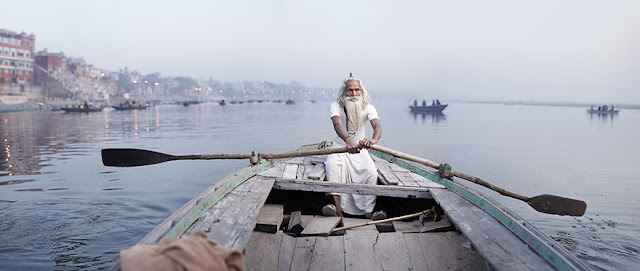
Photography I love the serenity in these pictures of Indian holy men. They make me want to go meditate by a misty lake early in the moring.

India's holy men India's holy men India's holy men India's holy men India's holy men India's holy men India's holy men India's holy men India's holy men Image Source: Bored Panda

Studio How neat are these pictures of the work spaces of famous artists? I feel like you either are a very organised or a very disorganised artist, there seems to be no in between. I think I would feel best at home in the studios of Eames, Miro, Yoshitomo Nara, Bacon or Picasso.

Ray Eames workspace The Workspace of Joan Miro The Workspace of Yoshitomo Nara The Workspace of Francis Bacon The Workspace of Pablo Picasso Image Source: Thinking Humanity

Nature If you're no fan of the flying bug department, you might want to scroll on quickly. Otherwise take your time to marvel at the absolute beauty of the Sino-Korean Owl Moth's caterpillar (Brahmaea certhia for the entomology geeks)! It's so otherworldly. I can also appreciate the moth itself although it's less spectacular.

Caterpillar of the Sino-Korean Owl Moth The Sino-Korean Owl Moth

Graphic Design Maria Mordvintseva made some wonderful packaging as part of a school assignment to bring social awareness to overpopulation in animal shelters. I really like the assignment and what she did with it.

Image Source: The Dieline

Words

Always be Bold of Italic, never regular

vrijdag 18 juli 2014

Link Love

With July thundering on and the weather finally on a more summery way I'm trying to enjoy the summer holliday and work on my resit assignments for school. At the same time I'm also very busy doing all the little tasks and chores I've been putting of for months. In the process of all of this I sort of forgot about blogging.. Not that I don't think up new stuff to write about, but the posts never seem to get finished. One of those posts that never got finished was my first Link Love post. Until now that is! I read a couple of interesting things that I just needed to share.

  • Lots of respect for the girls of the Hairy Leg Club. I'm shocked as to how shocked I am seeing girls with hairy legs and I'm probably not the only one... Definitely something that can and has to change!
  • I'm bad at making decisions, so I enjoyed this article about Taking Risks VS Being Reckless on Rock'n Roll Bride
  • Are you familiar with ARTtube? They make art & design videos. They've already got quite the collection of videos of interviews with designers, videos talking about different art forms and iconic design(er)s.
  • Gala reposted this article about not wanting kids a couple of days ago, but I was happy to read it as I'm only 26 and I already dread hearing the "When will you start having kids?" question. I'm not planning to have them and I'm not a freak.
  • This is one cool Kickstarter project! It's called Rainforest Connection and it's about repurposing old smartphones as listening devices in rainforest to stop illegal deforestation and poaching.
  • Somebody spent a lot of time (I think) to design the Simpsons characters using only CSS. As someone who just learned the basics of webdesign this geeks me out!

zaterdag 12 juli 2014

DIY Zitzak // DIY Bean Bag

DIY_zitzak10a

A long time ago, when I still made homework every day and the summer holliday was only two months long, I got this bean bag from a friend of mine. It best days were already long gone, but I didn't mind because I was planning on sewing it a new cover. Now, probably 9 years later, the bean bag was still untouched until my mother stated I should choose between throwing it out or taking it with me. So, that't why this thing landed in my studio: 

Heel, heel, heel lang geleden, toen ik nog huiswerk maakte en de zomervakantie maar twee maanden telde, kreeg ik een zitzak van een vriendin. Een beetje een afgeleefde zitzak wel, maar ik dacht "ha, ik maak wel eens een nieuwe cover". Fast forward erm... 9 jaar ofzo, de zitzak heeft nog steeds geen nieuwe hoes, de mama is dat ding al beu gekeken sinds dag één en ik krijg de keuze: meepakken of wegsmijten. En zo kwam het dat dit ding gisteren in mijn bureau belande:

DIY_zitzak01

Yes, that really is duct tape on the side. My pet rats didn't combine well with bean bags... It didn't take me a long time to decide something should be done about the bag, but I wasn't motivated enough to make the same model beanbag in a new fabric, since it was too much of a hassle with all the different pattern pieces. I decided to make a very simple, Fatboy-like bean bag, because whilst you can use it as a normal bean bag, you can also use it as a huge pillow to lie on in the garden. I made an inner an an outer bag. The first is made of an Ikea fabric I already had, cutting it into two 100cm x 150cm rectangles. After sewing those together and placing the old zipper from the original bean bag in this giant pillow case, I filled it with the bean bag filling. This is the part where a bowl, a vacuum cleaner and a box come in very handy. 

Jup, dat is duct tape daar op de zijkant. Ratjes en zitzakken, niet per se een goede combinatie... Het duurde dan ook niet lang om tot de conclusie te komen dat er echt wel iets met die zak moest gedaan worden. Hetzelfde model zitzak maken zag ik niet zitten, te veel stukjes om bij elkaar te puzzelen, dus werd er naar een simpele oplossing gezocht. Een Fatboy-achtige zitzak leek mij wel iets. Nog steeds de voordelen van een zitzak, maar ook bruikbaar als idioot groot kussen om in de tuin te gaan liggen. Ik knipte een binnenzak van 100cm op 150cm uit een effen Ikea stofje dat ik nog had. Uit de oude zitzak haalde ik de ritsen en plaatste er één van in de nieuwe binnenzak. De binnenzak werd gevuld met de inhoud van de zitzak, waarbij schepkom, doos en stofzuiger belachelijk goed van pas kwamen.

DIY_zitzak02

Next, I made the outer bag from my only second-hand retro fabric find ever, using the same dimensions as the inner bag. I didn't have a zipper big enough to use for the bottom part, so I used snap fasteners instead. Because I liked the Fatboy look, I topstitched the entire bean bag 1,5cm from the edge.

Vervolgens offerde ik mijn enige kringloopwinkel vondst op gebied van coole retro stofjes op en knipte een buitenzak volgens dezelfde afmetingen. De onderzijde van de buitenzak zoomde ik om en (bij gebrek aan rits) plaatste ik (nuja, het Vriendje) knippers om de zak te sluiten. Om de Fatboy-look te vervolledigen topstitchte ik de zak nog eens, op 1,5cm van de rand.

DIY_zitzak03 DIY_zitzak04 DIY_zitzak07

We had like two minutes of sun this morning, so I snapped some quick pictures outside.

De binnenzak werd in de buitenzak geplaatst en tijdens de twee minuten zon die we deze morgen in Gent hadden werden er vlug wat foto's genomen.

DIY_zitzak09 DIY_zitzak12 DIY_zitzak13 DIY_zitzak15

I used Schrödinger as a reference for the size of the pillow, sadly he didn't look very enthusiastic. // Schrödinger werd ingezet om de afmetingen van het kussen nog eens in de verf te zetten. Al was het enthousiasme niet al te groot.

DIY_zitzak16

I, on the other hand, am very happy with my giant pillow/bean bag. I hoping for a couple of sunny days the next weeks, so I can lay around, enjoy the sun and read some books. ^-^

Mijn enthousiasme is alvast wel al heel groot en ik duim vurig voor nog een paar zonnige dagen de komende weken, zodat er kan gelegen, gezond en gelezen worden. ^-^

DIY_zitzak14
  • Fabric: the inner fabric is from Ikea (€5/m), the outher fabric is from a second hand store (€4) // Stof: Ikea voor de witte binnenstof (€5/m) en de Kringloopwinkel voor de buitenstof (€4)
  • Time: Everything together, maybe 1-2 hours // Tijd: Alles bij elkaar, misschien een uur of 2
  • Costs: €14 for the fabrics, all my other materials are either recycled from the original bean bag or were left overs from earlier projects // Prijs: €14 aan stof, rest is gerecycleerd van de oorspronkelijke zak of waren overschotjes van vorige projecten